Dangerous Decibels Program Walk-Through: 1. Introduction

Three Ways to Protect Your Ears

Third, create curiosity and excitement about the Dangerous Decibels program and the upcoming activities.

  • Explain the purpose of the Dangerous Decibels program.
  • Begin interacting with the students and engaging them.
  • Introduce the 3 ways to protect your ears.
This part of the INTRODUCTION is especially important because it will set the framework for the rest of the program in terms of getting the students to participate directly with you as the educator. This happens first when you ask the students for suggestions regarding 3 ways to fight dangerous decibels. If they can see and read the caution signs you brought, the answers will be a “give-a-way” for them, and they won’t have to think for themselves. Ideally, the students will have a chance to think about their response and give both correct and incorrect answers as they brainstorm as a group. Use the caution signs to reinforce the correct answers and place them on the whiteboard or wall space. If necessary, you can give them some “hints” if they can’t produce the correct answers on their own.
3 Strateties: Turn it down, Protect your ears, Walk Away
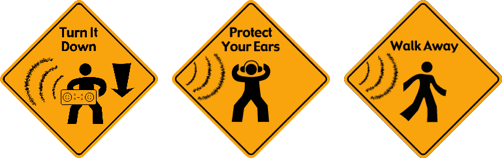
The 3 caution signs are first introduced at this point but keep the signs handy or posted on a whiteboard, since they will be used throughout the Dangerous Decibels Program. We’ve included some mounting putty in your kits to use to help stick them up on walls or surfaces.
Key iconWhen “Protect Your Ears” is mentioned teach the kids that Kleenex, toilet paper,and cotton balls are NOT good ear protection. They can break off in your ear and they do not even block dangerous decibels.
Key iconBeing around loud sounds a lot WILL NOT help your ears get used to it.